Teacher's guide
Introduction
Purpose
The purpose of this election simulation is to introduce kindergarten to grade 3 students to the basic principles of a real election. Students are invited to choose a mascot that will best represent the spirit of their class by voting by secret ballot for one of the five candidates: Charlie the Raven, Desneiges the Polar Bear, Max the Walrus, Neevee the Caribou or Sam the Grey Wolf.
Outcome
Students will gain a basic understanding of democracy by experiencing how voting can help a group make a choice. They will practise using simple elections vocabulary and marking a ballot. They will also practise decision-making by comparing the qualities of the five candidates as they vote for a class mascot.
Time Needed
60 minutes – Teachers who would like to create a longer session may expand on the election campaign.
Participation
All students are voters. Several students are also called upon to carry out various tasks during the election. The idea is to involve as many students as possible.
The simulation Choosing Our Mascot is aimed at children ages 4 to 9. However, since the maturity level of participants may vary from one group to another, this kit indicates the level of complexity for each step by grade level.
Preparation
Materials
The following materials are provided in different formats to help meet your needs. You can also find all essential materials for this lesson at the bottom of the page.
Printable materials
- Posters [HTML] [PDF]
- Election vocabulary [HTML] [PDF]
- Campaign speeches and songs [HTML] [PDF]
- Voters list [HTML] [PDF]
- Sample ballot papers [HTML] [PDF]
- Samples of marked ballot papers [HTML] [PDF]
- Tally sheet [HTML] [PDF]
- Election results [HTML] [PDF]
- Certificate [HTML] [PDF]
- Inuktitut syllabarium chart [HTML] [PDF]
- Printable activity sheets [PDF]
Digital material
- Campaign Speeches video [Link to Youtube] [Transcript]
- Campaign Songs video [Link to Youtube] [Transcript]
Getting Ready
Make a voters list using the template provided or the class list.
Photocopy and cut the number of ballot papers your group needs. Prepare an extra 10 percent in case of spoiled ballots. If you are using the online activity sheets, print enough for your students.
Note: You may tell the group that in a real election, the names of the candidates are printed on the ballot paper in alphabetical order, by family name, to keep things fair. There are no photographs of the candidates on the ballot.
Create two distinct areas in the room. The electoral campaign will take place in the first area. The election will be conducted in the second area. Make sure that no materials promoting a particular candidate enter the voting area.
Put up the candidates’ posters in the campaign area. Make sure each candidate is given equal visibility.
Set up the polling station in the voting area (see the diagram provided). This includes making up the ballot box and leaving the top open until it has been shown to be empty. Leave a pencil behind the voting screen.
As the teacher or group leader, you will play the role of returning officer. This is the person responsible for conducting the election in the electoral district where they live. Like all other citizens, the returning officer is allowed to vote, but they cannot publicly support any candidate in the election.
Have the students make up their own piece of identification showing their name and grade/class number.
Setting up the polling station
Here is one way you could set up your polling station. Your classroom might look different. Set up the polling station so that everyone’s vote is secret and the election runs smoothly. Place the ballot box on a table. Place the voting screen and a pencil on another table. Make sure the voting screen is facing away from everyone and that there is enough room for the voters to line up before they vote. Make sure that voters can access the ballot box after they have voted.

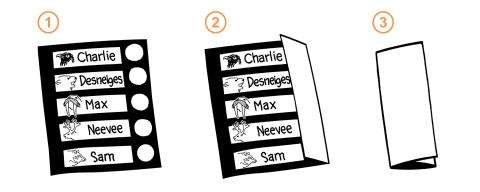
Folding the ballot paper
Fold each ballot in three.
Simulation – Step by step
Explain to the group that they will have an election to choose a class mascot. They will vote in secret for the candidate of their choice: Charlie the Raven, Desneiges the Polar Bear, Max the Walrus, Neevee the Caribou or Sam the Grey Wolf. Students can practise reading the candidates’ names in Inuktitut using the syllabarium chart provided.
Ask the students these questions to help them understand the basic principles of a real election. You can pre-teach the vocabulary using the Election vocabulary handout provided.
A. What is an election?
An election is an activity where a group chooses a person to speak for them about important things that affect their lives.
Examples: election of a member of Parliament to represent Canadians who live in a certain area of the country; election of a class president to represent students
B. What does voting mean?
Voting means choosing.
Note: Tell students that there would be no election if there were only one candidate.
C. Who has the right to vote in a Canadian federal election?
People who are:
- 18 years of age or older; and
- Canadian citizens.
The names of these people have to be on the voters list for them to use their right to vote.
D. What is a candidate?
A candidate is someone who runs for office.
Examples: a person who wants to be elected as a member of Parliament; someone who wants to represent their class.
E. How do I mark my ballot?
To mark your ballot, make an X in the circle beside the name of the candidate you are voting for.
- You can vote for only one candidate.
- You must not write your name or anything else that might tell people who you are.
Show students the handout “Samples of marked ballot papers” for examples of how to mark a ballot. Tell them that if they make a mistake when they mark their ballot, they can get a new ballot paper.
F. Why do I vote in secret?
You vote in secret because your vote is your personal choice. No one else needs to know how you vote.
You have the right to make this choice:
- by yourself;
- without help from anyone else; and
- without having to tell your friends.
Note: We don’t tell people who we are voting for so that no one can influence our decision. Also, we don’t want to hurt our friends’ feelings if we don’t vote for them or if we don’t vote for the same person they do.
G. How is my vote kept secret?
- All the ballot papers look exactly the same, so no one will know which one is yours.
- The voting screen (a hiding place) allows you to vote without anyone seeing.
- The ballot papers are all dropped into the same ballot box and mixed together.
- No ballot can be set apart, so nobody can tell who voted for which candidate.
Campaigning
The election campaign introduces the five candidates to the students in a fun and age-appropriate way. This kit contains a poster for each candidate and a copy of each candidate's campaign speech. Five students may hold the posters while you or five participants read the speeches with lots of expression. Have the group listen to and take part in the candidates’ short campaign songs. Both the campaign speeches and songs can be accessed online. The words to the songs and the gestures that go with them are also included in this resource. Encourage all students to get involved in the campaign. Explain that many people are involved in helping every candidate during a real election.
When the five speeches and songs are over, explain that the campaign is now finished. It is time to vote for their favourite candidate. To help with classroom management, you can have students work on their activity sheets while waiting to vote or after they vote.
Voting
To keep things simple, this section has been divided into two subsections by grade level:
- Section (A): for kindergarten and grade 1
- Section (B): for grades 2 and 3
(A) For kindergarten and grade 1
- Ask a student to show the group that the ballot box is empty. Then close the box.
- Ask someone to be responsible for the polling station. This student will fold the ballot papers in two and distribute them one at a time.
- Explain the voting procedures to the group.
- Students will come forward one at a time to the polling station and receive a folded ballot paper.
- Each student will go behind the voting screen, unfold the ballot paper and mark it properly.
- Each student will refold the ballot paper in two and drop it in the ballot box.
(B) For grades 2 and 3
- Ask someone in the group to show that the ballot box is empty. Ask another student to close the box.
- Designate two election officers for the polling station. Give the election officers the ballots. Ask them to fold the ballots in three as shown in the “Preparation” section. Then ask them to write their initials on the back of each ballot.
- Explain the voting procedures to the group.
- Students will come forward one at a time, say their name out loud and show their ID to one of the officers. This will prove who they are and show that they are voting at the right place. One of the officers will cross the person’s name off the voters list.
- The other officer will then give the student a ballot paper that is folded in three.
- Each student will go directly behind the voting screen and mark the ballot properly.
- Each student will then refold the ballot paper in three and bring it to the election officer. The election officer will check to make sure it is the same ballot, with their initials on the outside.
- Each student will drop their ballot in the ballot box.
Counting the votes
Once every elector has voted, the votes are counted using the following procedure.
- Section (A): for kindergarten and grade 1
- Section (B): for grades 2 and 3
(A) For kindergarten and grade 1
- Open the ballot box and empty its contents on the table, or ask a student to do this.
- Send five students, one for each candidate, to the board, where they will record the votes their candidate receives. Ask one student to unfold the marked ballots, show each one to the group, and say the name of the candidate for whom it is marked. A ballot paper is rejected if it is marked improperly (see “Samples of marked ballot papers”).
- Fill in the Election results form and explain to the class what you are doing.
- As the returning officer, announce the name of the elected mascot and fill in the certificate provided. This certificate may be posted in the room to remind students of their first voting experience.
(B) For grades 2 and 3
- Ask one of the election officers to open the ballot box and empty it onto the table.
- Ask the election officers to use the tally sheet provided to add up the votes. One officer can check the square on the tally sheet under the name of the corresponding candidate. The other will make a separate pile of ballot papers for each candidate as they read out the result.
- The election officers fill in the Election results form.
- As the returning officer, announce the name of the elected mascot and fill in the certificate provided. This certificate may be posted in the room to remind students of their first voting experience.
Victory Celebration
Allow the class a few minutes to celebrate and wind down. Use this time to ask what they thought of the election. Help them understand that even though only one candidate was elected, all five candidates are happy because they participated.
It may be a good idea to serve refreshments or have balloons or make this period feel like a celebration in some other way. The objective is to help students understand that voting is secret, simple, easy and important, and that winning is not the only thing that matters. Exercising our democratic right to vote is what is most important
About this resource
About the cover
Inuksuk (plural: inuksuit) means “to act in the capacity of a human.” For thousands of years, Inuit have used inuksuit as markers throughout the Arctic. These handmade stone structures helped hunters, guided travellers, and allowed people to communicate with one another across time and distance. Today, inuksuit remain important landmarks across the Arctic.
About the artist: Germaine Arnaktauyok
Germaine was born in Igloolik, Nunavut. Being part of the art world has given her a reason to travel widely and far from the community of her birth.
She studied Fine Arts at the University of Manitoba. A perfectionist in her art, Germaine constantly strives to learn new techniques, including the art of intaglio etching with a master printer in Montréal and, more recently, lithograph printing on Mylar. Both techniques allow her to etch her finely detailed work (she usually works in pen, ink and pencil) directly into the medium and thus create multiple original prints in limited editions.
Germaine has worked as an artist in Iqaluit and Yellowknife as well as in major cities in British Columbia, Alberta, Ontario and Quebec. She has illustrated over 30 children’s books and has completed work on a book by C.W. Nicol called The Raven's Tale, simultaneously released in Canada and Japan. Her travels have taken her to Israel to do a poster for El Al Airlines, to Greenland and Sweden on an art exchange, and to Washington, DC, as part of a delegation of Canadian artists. She also designed and executed a beautiful mural in the Inuit Art section of the Prince of Wales Northern Heritage Centre in Yellowknife. Germaine has had successful shows in Montréal and Vancouver. While in Montréal, she worked for the National Film Board, designing a stage and puppets with Co Hoedeman for the animated film The Owl and the Lemming, based on the Inuit legend. Five of Germaine’s works were acquired for the Art from the Arctic exhibition, which toured five countries.
Germaine created “The Drum Dance,” the design that graces the back of the 1999 $2 coin, as well as “Mother and Child” for the 2000 $200 gold coin – part of the Royal Canadian Mint’s Native Cultures and Traditions series honouring Inuit motherhood.
In 2015 she released her autobiography, My Name Is Arnaktauyok: The Life and Art of Germaine Arnaktauyok (Inhabit Media).